How I Used Deep Learning To Train A Chatbot To Talk Like Me (Sorta)
Introduction
Chatbots are “computer programs which conduct conversation through auditory or textual methods”. Apple’s Siri, Microsoft’s Cortana, Google Assistant, and Amazon’s Alexa are four of the most popular conversational agents today. They can help you get directions, check the scores of sports games, call people in your address book, and can accidently make you order a $170 dollhouse.
These products all have auditory interfaces where the agent converses with you through audio messages. In this post, we’ll be looking more at chatbots that operate solely on the textual front. Facebook has been heavily investing in FB Messenger bots, which allow small businesses and organizations to create bots to help with customer support and frequently asked questions. Chatbots have been around for a decent amount of time (Siri released in 2011), but only recently has deep learning been the go-to approach to the task of creating realistic and effective chatbot interaction.
In this post, we’ll be looking at how we can use a deep learning model to train a chatbot on my past social media conversations in hope of getting the chatbot to respond to messages the way that I would.
Problem Space
From a high level, the job of a chatbot is to be able to determine the best response for any given message that it receives. This “best” response should either (1) answer the sender’s question, (2) give the sender relevant information, (3) ask follow-up questions, or (4) continue the conversation in a realistic way. This is a pretty tall order. The chatbot needs to be able to understand the intentions of the sender’s message, determine what type of response message (a follow-up question, direct response, etc.) is required, and follow correct grammatical and lexical rules while forming the response.
It’s safe to say that modern chatbots have trouble accomplishing all these tasks. For all the progress we have made in the field, we too often get chatbot experiences like this.
"Oh no! Artificial Intelligence is totally going to take over the world! Because deep learning models neurons!" pic.twitter.com/5UEpel4k6H
— Reza Zadeh (@Reza_Zadeh) August 17, 2016
Chatbots are too often not able to understand our intentions, have trouble getting us the correct information, and are sometimes just exasperatingly difficult to deal with. As we’ll see in this post, deep learning is one of the most effective methods in tackling this tough task.
Deep Learning Approach
Chatbots that use deep learning are almost all using some variant of a sequence to sequence (Seq2Seq) model. In 2014, Ilya Sutskever, Oriol Vinyals, and Quoc Le published the seminal work in this field with a paper called “Sequence to Sequence Learning with Neural Networks”. This paper showed great results in machine translation specifically, but Seq2Seq models have grown to encompass a variety of NLP tasks.
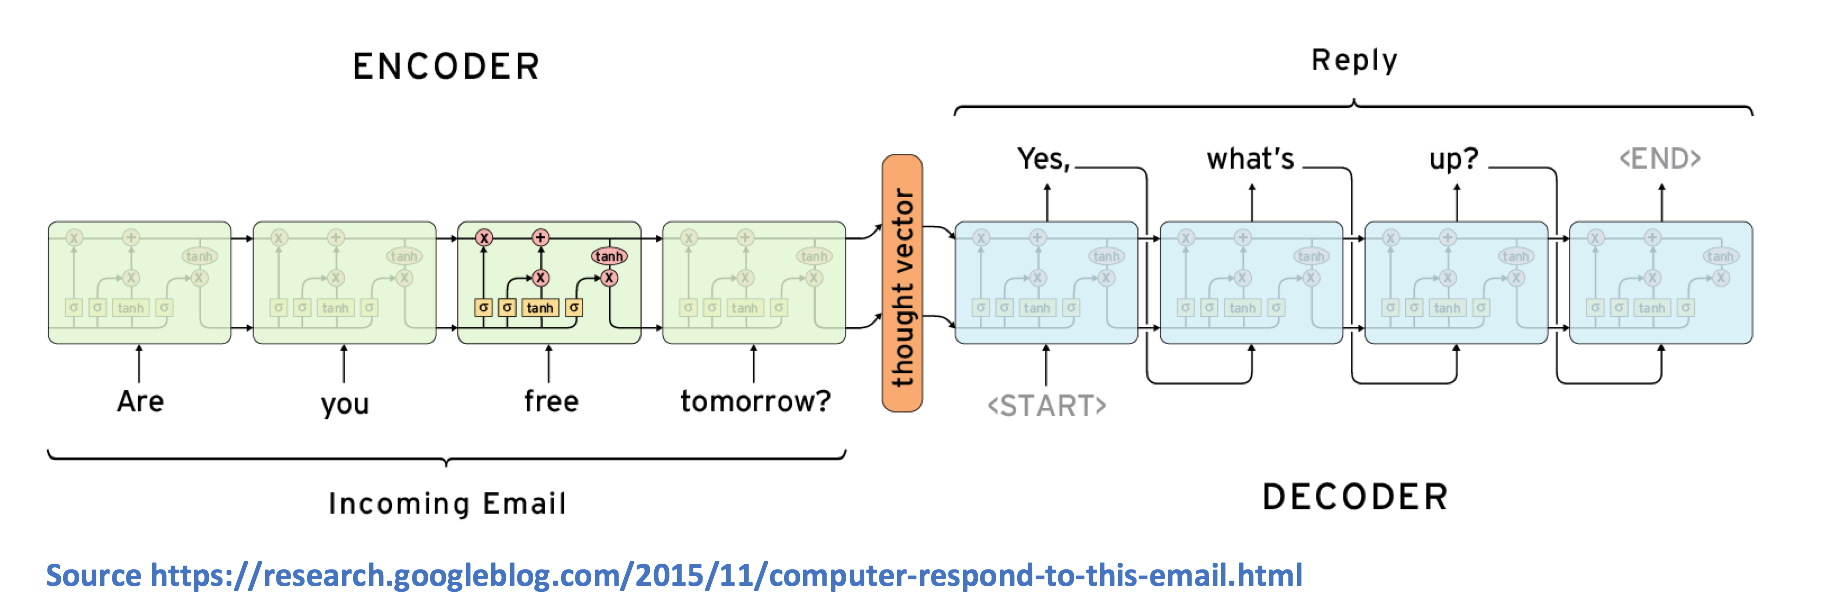
A sequence to sequence model is composed of 2 main components, an encoder RNN and a decoder RNN (If you’re a little shaky on RNNs, check out my previous blog post for a refresher). From a high level, the encoder’s job is to encapsulate the information of the input text into a fixed representation. The decoder’s is to take that representation, and generate a variable length text that best responds to it.
Let’s look at how this works at a more detailed level. As you remember, an RNN contains a number of hidden state vectors, which each represent information from the previous time steps. For example, the hidden state vector at the 3rd time step will be a function of the first 3 words. By this logic, the final hidden state vector of the encoder RNN can be thought of as a pretty accurate representation of the whole input text.
The decoder is another RNN, which takes in the final hidden state vector of the encoder and uses it to predict the words of the output reply. Let's look at the first cell. The cell's job is to take in the vector representation v, and decide which word in its vocabulary is the most appropriate for the output response. Mathematically speaking, this means that we compute probabilities for each of the words in the vocabulary, and choose the argmax of the values.
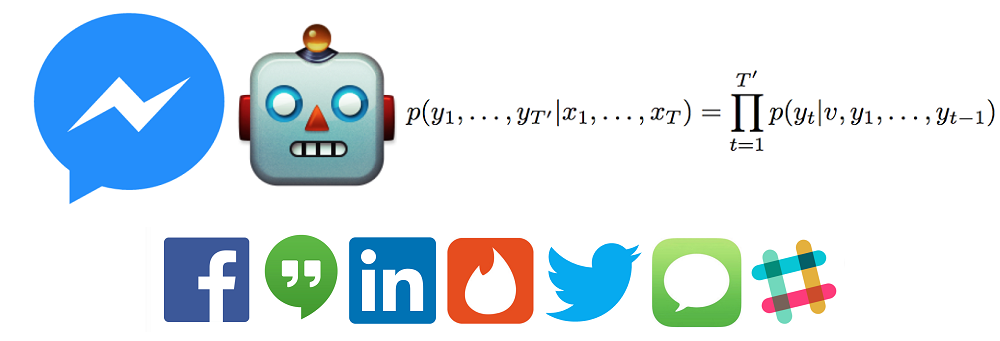
The 2nd cell will be a function of both the vector representation v, as well as the output of the previous cell. The goal of the LSTM is to estimate the following conditional probability.

Let's deconstruct what that equation means. The left side refers to the probability of the output sequence, conditioned on the given input sequence. The right side contains the term p(yt|v, y1, …, yt-1), which is a vector of probabilities of all the words, conditioned on the vector representation and the outputs at the previous time steps. The Pi notation is simply the multiplication equivalent of Sigma (or summation). The right hand side can be reduced to p(y1|v) * p(y2|v, y1) * p(y3|v, y1, y2) ... and so on.
Let’s go over a quick example before moving on. Let’s take the input text we saw in the first image. Given the phrase “Are you free tomorrow?”, let’s think about how most people would answer the question. A majority will start with something along the lines of “Yes”, “Yeah”, “No”, etc. After we’re done training our network, the probability p(y1|v) will be a distribution that looks like the following.

The second probability we need to compute, p(y2|v, y1), will be a function of the word this distribution y1 as well as the vector representation v. The result of the Pi (product) operation will give us the most likely sequence of words, which we’ll use as our final response.
One of the most important characteristics of sequence to sequence models is the versatility that it provides. When you think of traditional ML methods (linear regression, SVMs) and deep learning methods like CNNs, these models require a fixed size input, and produce fixed size outputs as well. The lengths of your inputs must be known beforehand. This is a significant limitation to tasks such as machine translation, speech recognition, and question answering. These are tasks where we don't know the size of the input phrase, and we'd also like to be able to generate variable length responses, not just be constrained to one particular output representation. Seq2Seq models allow for that flexibility.
The Seq2Seq model has seen numerous improvements since 2014, and you can head to the ‘Interesting Papers’ section of this post to read more about them.
Dataset Selection
When thinking about applying machine learning to any sort of task, one of the first things we need to do is consider the type of dataset that we would need to train the model. For sequence to sequence models, we need a large number of conversation logs. From a high level, this encoder decoder network needs to be able to understand the type of responses (decoder outputs) that are expected for every query (encoder inputs). Some common datasets are the Cornell Movie Dialog Corpus, the Ubuntu corpus, and Microsoft’s Social Media Conversation Corpus.
While most people train chatbots to answer company specific information or to provide some sort of service, I was more interested in a bit more of a fun application. With this particular post, I wanted to see whether I could use conversation logs from my own life to train a Seq2Seq model that learns to respond to messages the way that I would.
Where's the Data Coming From?

Alright hmm, let’s see how we can do this. We need to create a large dataset of conversations that I’ve had with people online. Over the course of my time on social media, I’ve used Facebook, Google Hangouts, SMS, LinkedIn, Twitter, Tinder, and Slack to stay in touch with people.
- Facebook: This is where the bulk of the training data will come from. Facebook has a cool feature that allows you to download a copy of all of your Facebook data. This download will contain all your messages, your photos, and your all-caps, cringe filled statuses that you wrote as a middle schooler.
- Google Hangouts: I definitely used this a lot with a close set of friends during high school. You can extract of your chat data by following the instructions on this fantastic blog post.
- SMS/Texting: Pretty sure there is a way to get an archive of all prior chats (SMS Backup+ is a good app), but I rarely use text anyway, so don’t think it’ll be worth the effort.
- LinkedIn: LinkedIn does provide a tool to get an archive of your data here.
- Twitter: Not enough private messages for this to be useful.
- Tinder: Ummm, yeah let’s just say that these conversations are not dataset worthy .
- Slack: Just recently started using this, and only having a couple private messages, so just planning to manually copy over the convos.
Dataset Creation
A big part of machine learning involves dataset preprocessing. The data archives from each of these sources comes differently formatted, and contains parts that we don’t really need (the pictures section of our FB data for example).
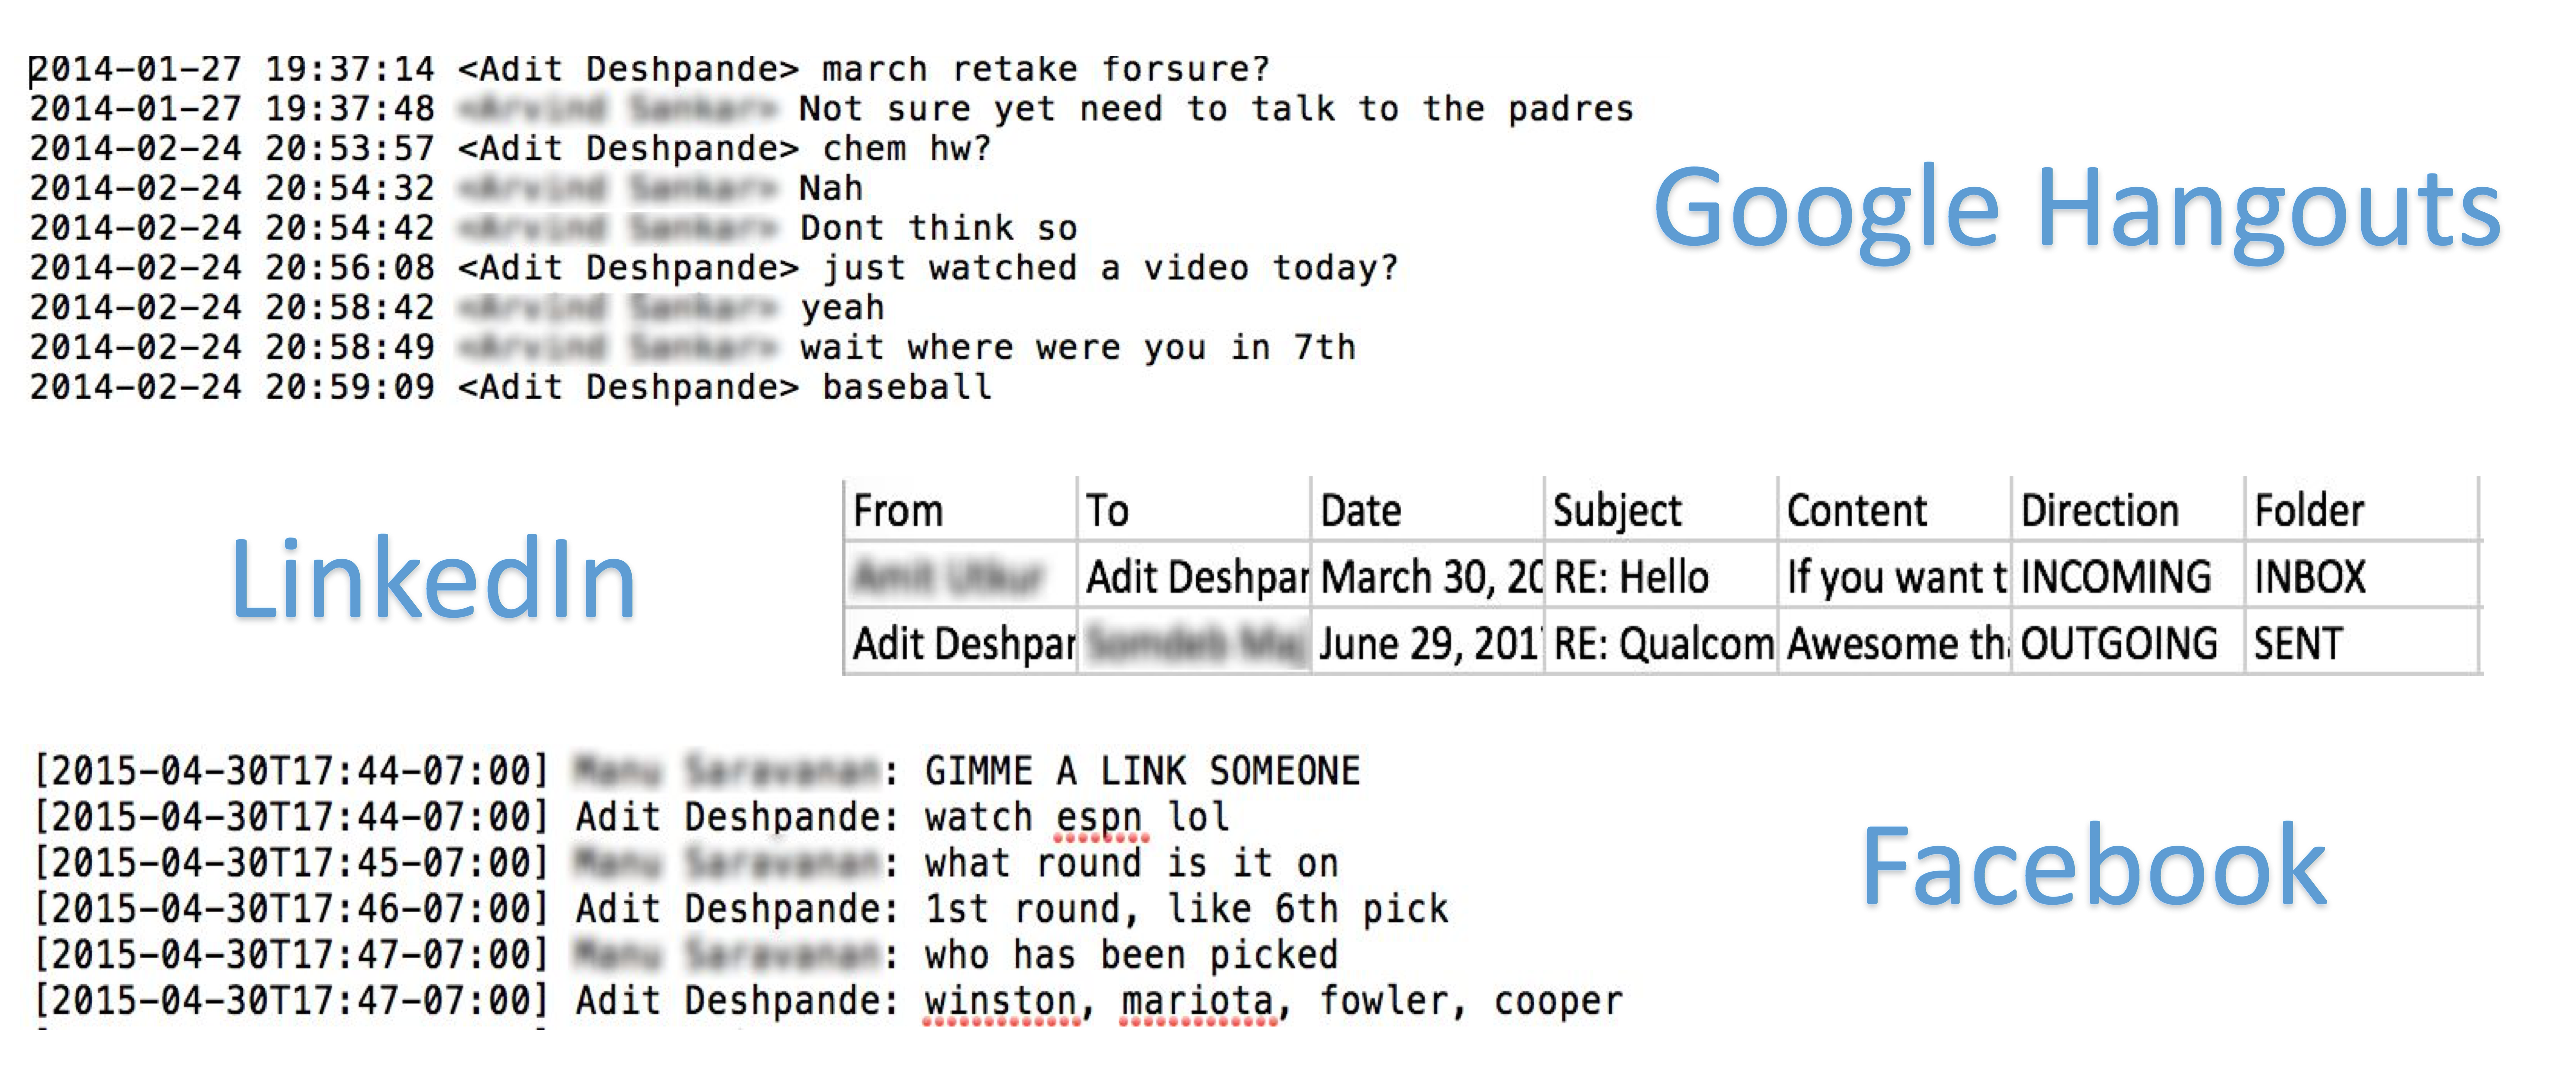
As you can see, the Hangouts data is formatted a bit differently from the Facebook data, and the LinkedIn messages are in a CSV format. Our goal, with all these datasets, is to just create one unified file that contains pairs in the form of (FRIENDS_MESSAGE, YOUR_RESPONSE).
To do that, I wrote a Python script that you can check out here. This script will create two different files. One will be a Numpy object (conversationDictionary.npy) that contains all of the input output pairs. The other will be a large txt file (conversationData.txt) that contains these pairs in sentence form, one after the other. Normally, I love being able to share datasets, but for this specific one, I’m keeping it private just because it has a lot of private conversations, and I don’t think my friends would be happy if they were just floating around on the internet. But here’s a snapshot of how the final dataset looks like.

Word Vectors
LOL. Lmao. Wtf. These are all words that showed up quite frequently in our conversation data file. While they are common in the realm of social media, they aren’t in a lot of traditional datasets. Normally, my first instinct when approaching any NLP task is to simply use pre-trained vectors, as they are trained on large corpuses for a large number of iterations. However, given that we have so many words and acronyms that aren’t in typical pre-trained word vector lists, generating our own word vectors Is critical to making sure that the words get represented properly.
To generate word vectors, we use the classic approach of a Word2Vec model. The basic idea is that the model creates word vectors by looking at the context with which words appear in sentences. Words with similar contexts will be placed close together in the vector space. For a more detailed overview of how a Word2Vec model is created and trained, check out this great blog post by one of my good friends, Rohan Varma.
I trained the Word2Vec model in this Python script here, which saves the word vectors in a Numpy object.
**Update: I later learned that the Tensorflow Seq2Seq function trains word embeddings from scratch, so I don’t end up using these word vectors, but it was still good practice **
Creating a Seq2Seq Model with Tensorflow
Now that we’ve created the dataset and generated our word vectors, we can move on to coding the Seq2Seq model. I created and trained the model in this Python script. I’ve tried to comment the code to the best of my ability, so hopefully you can follow along. The crux of the model lies in Tensorflow’s embedding_rnn_seq2seq() function. You can find documentation for it here.
Tracking the Training Progress
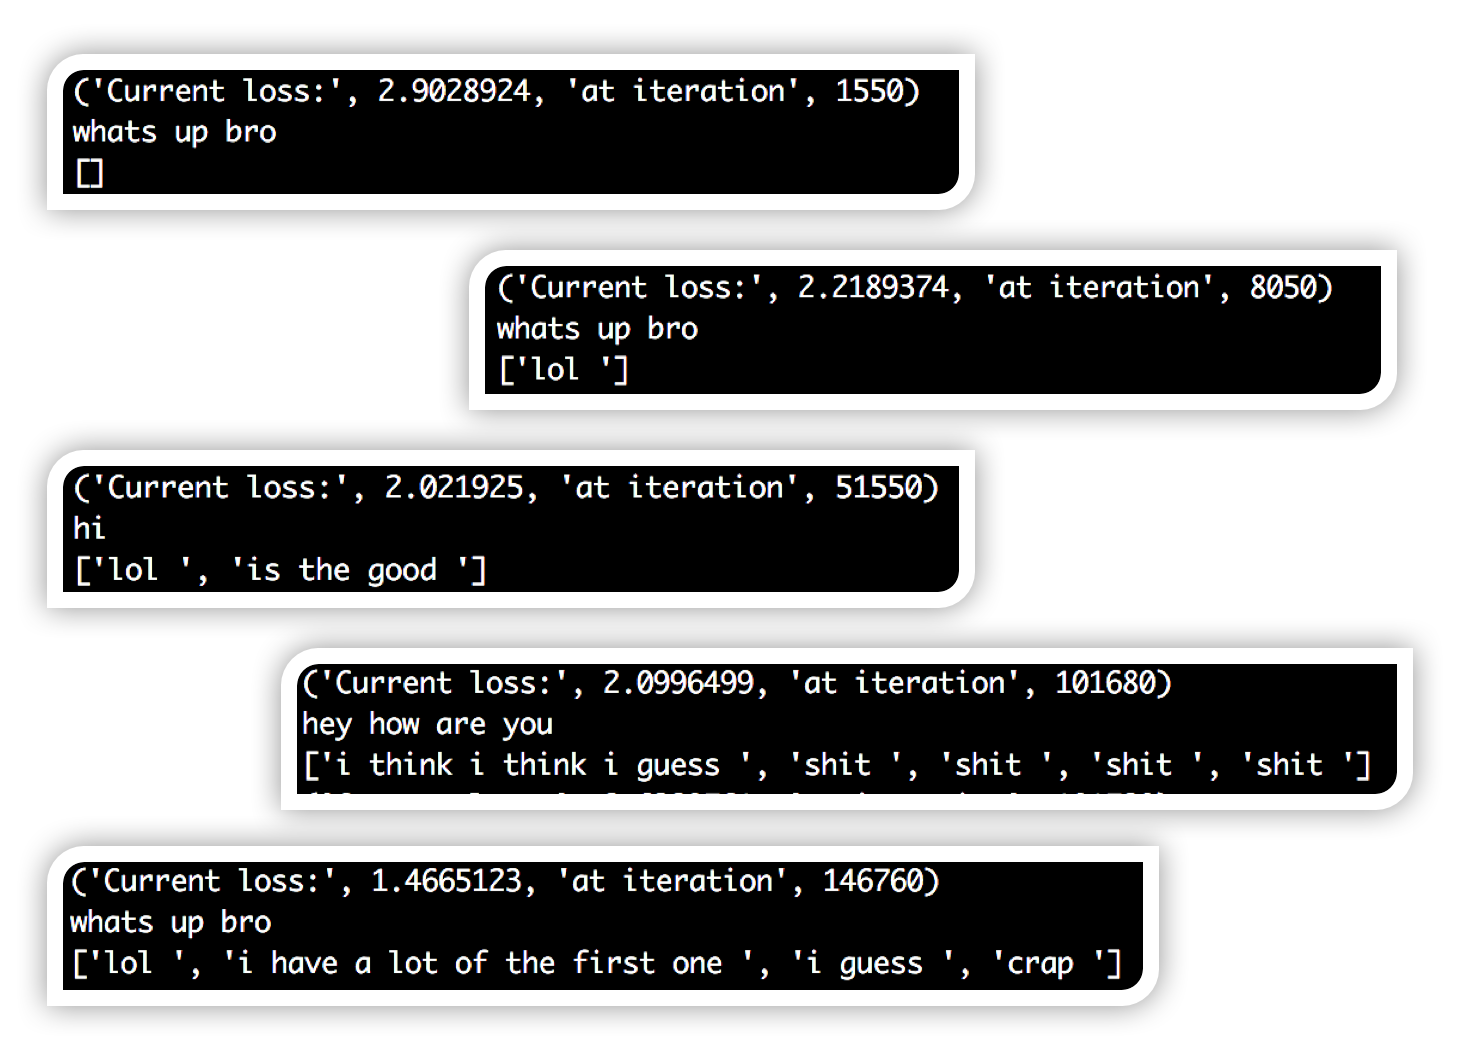
One of the interesting aspects of this project was getting a chance to look at how the responses changed as the network trained. At different points in the training loop, I tested the network on an input string, and outputted all of the non-pad and non-EOS tokens in the output. At first, you can see that the responses were mainly blank, as the network repeatedly outputted padding and EOS tokens. This is normal since padding tokens are by far the most frequent token in the whole dataset. Then, you can see that the network starts to output ‘lol’ for every single input string it is given. This makes sense intuitively since ‘lol’ gets used so often these days that it kind of is an acceptable response to anything. Slowly, you start to see more complete thoughts and grammatical structure come up in the responses. Could be due to a bit of overfitting as well.
Setting up the Facebook Messenger Chatbot
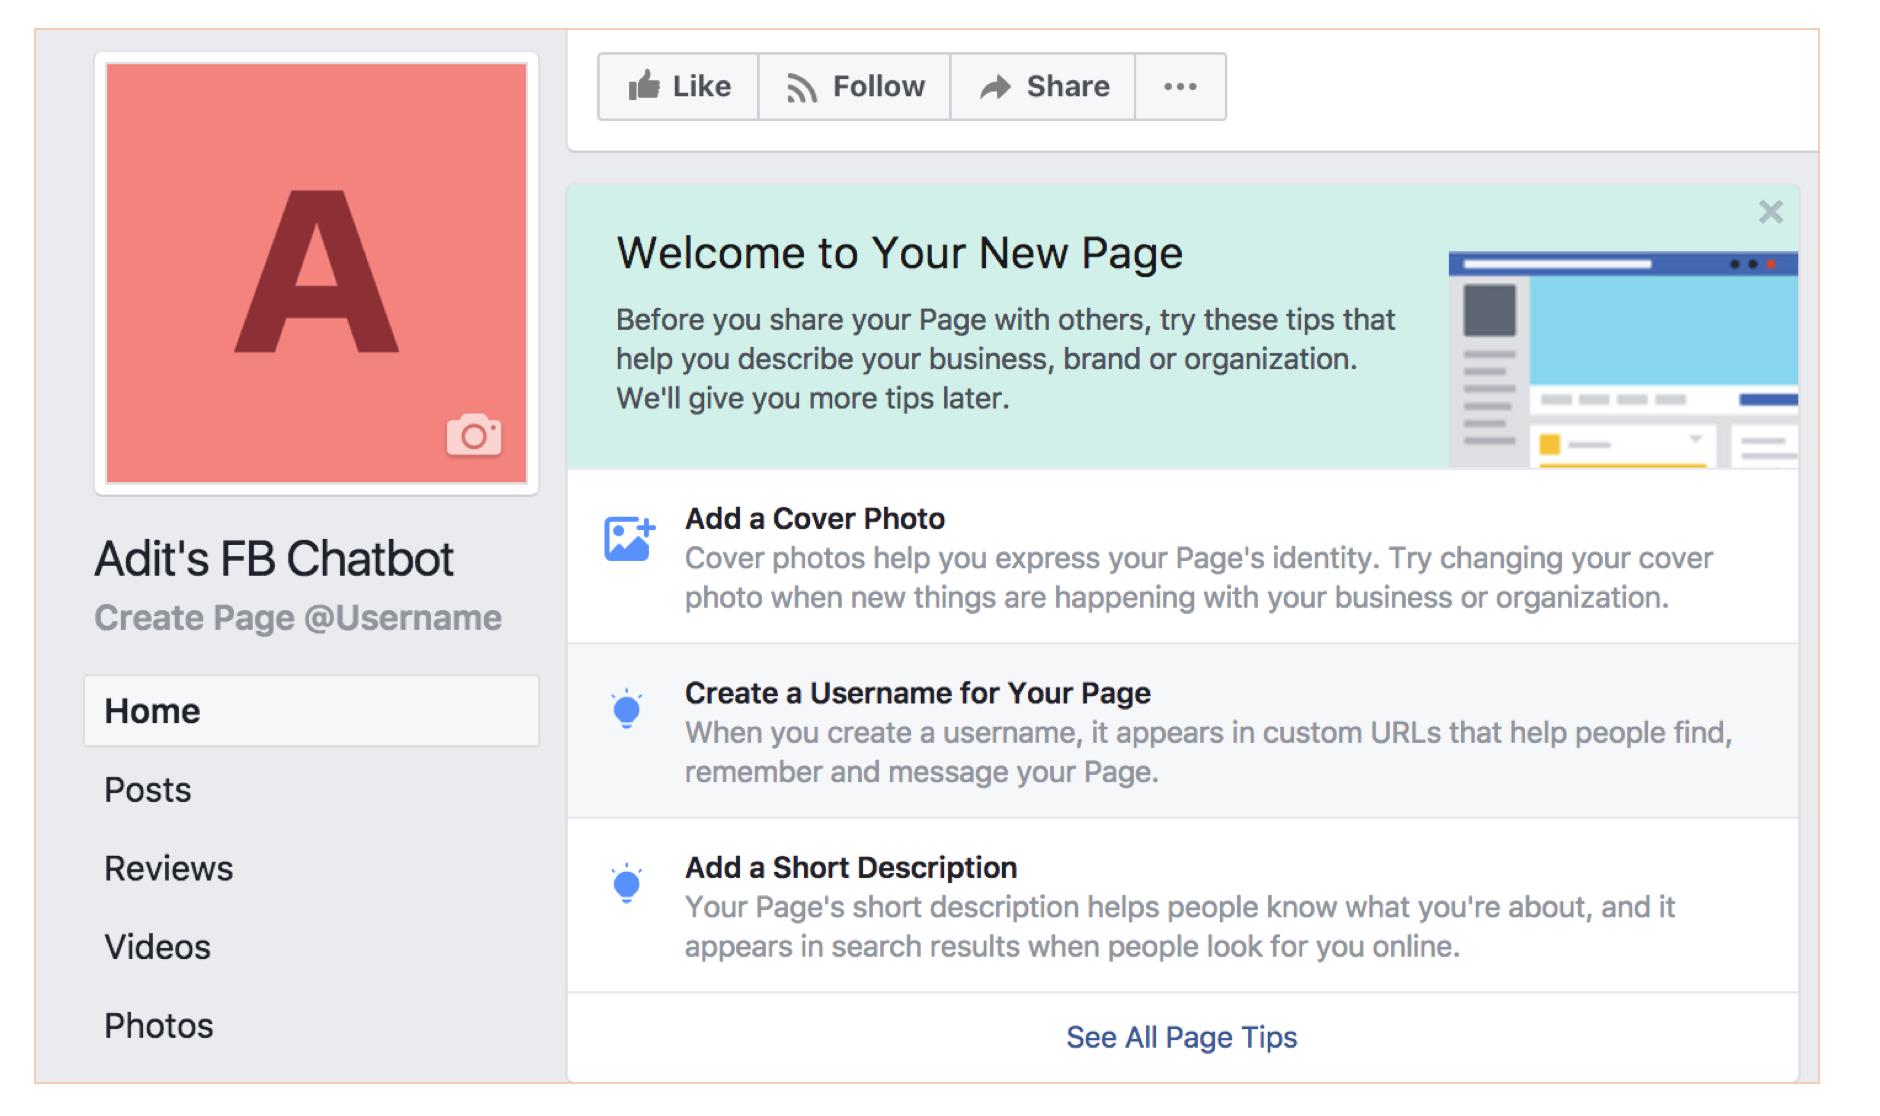
Now that we have a decently trained Seq2Seq model, let’s look at how to set up a simple FB messenger chatbot. The process was not too difficult, as it took me a little less than 30 minutes by following all the steps on this great tutorial. The basic idea is that we set up a server using a simple Express app, host it on Heroku, and then set up a Facebook App/Page to connect to it. Won’t go into too much detail beyond that, since I really thought that the author did a great job of explaining everything step by step, but at the end, you should have a Facebook app like this.
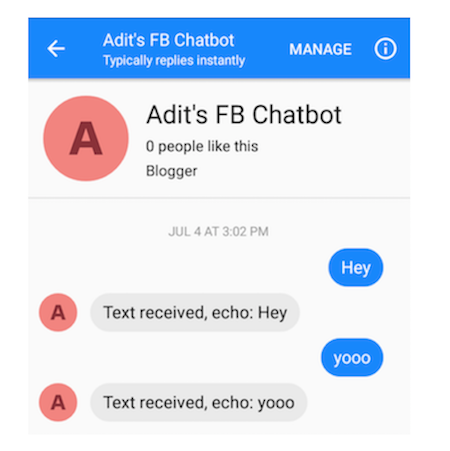
And you should be able to message your bot (This initial behavior is just echoing everything it gets sent).
Deploying our trained Tensorflow Model
So, now it’s time to put everything together. Since I haven’t found a good interface between Tensorflow and Node (don’t know if there’s an officially supported wrapper), I decided to deploy my model using a Flask server, and have the chatbot’s Express app interact with it.
You can check out the Flask server code here and the chatbot’s index.js file here.
Testing it Out!
If you’d like to chat with this bot, just go ahead and go to this link or go to this Facebook page and hit the Send Message button. It might take a while to respond for the first time, since the server needs to start up.
UPDATE 6/13/18: FB changed some of their settings with bots so I am not sure if the Messenger bot works. However, you can also send POST requests to the server using CURL in your command prompt. Basically, go to your Terminal/Cmd Prompt and type in:
curl -i -X POST -H 'Content-Type: application/json' -d '{"message": "INSERT YOUR MESSAGE HERE"}' https://flask-server-seq2seq-chatbot.herokuapp.com/prediction
The response will be the answer that my trained chatbot would send.
It’s probably difficult to judge whether or not the bot actually does talk like me (since not a lot of you have talked to me online LOL), but I’d say it’s doing alright! The grammar is passable, considering social media standards. You can cherry pick a couple good results, but most are pretty nonsensical. Here are some of the ones which help me sleep better at night because Skynet definitely isn’t happening any time soon.
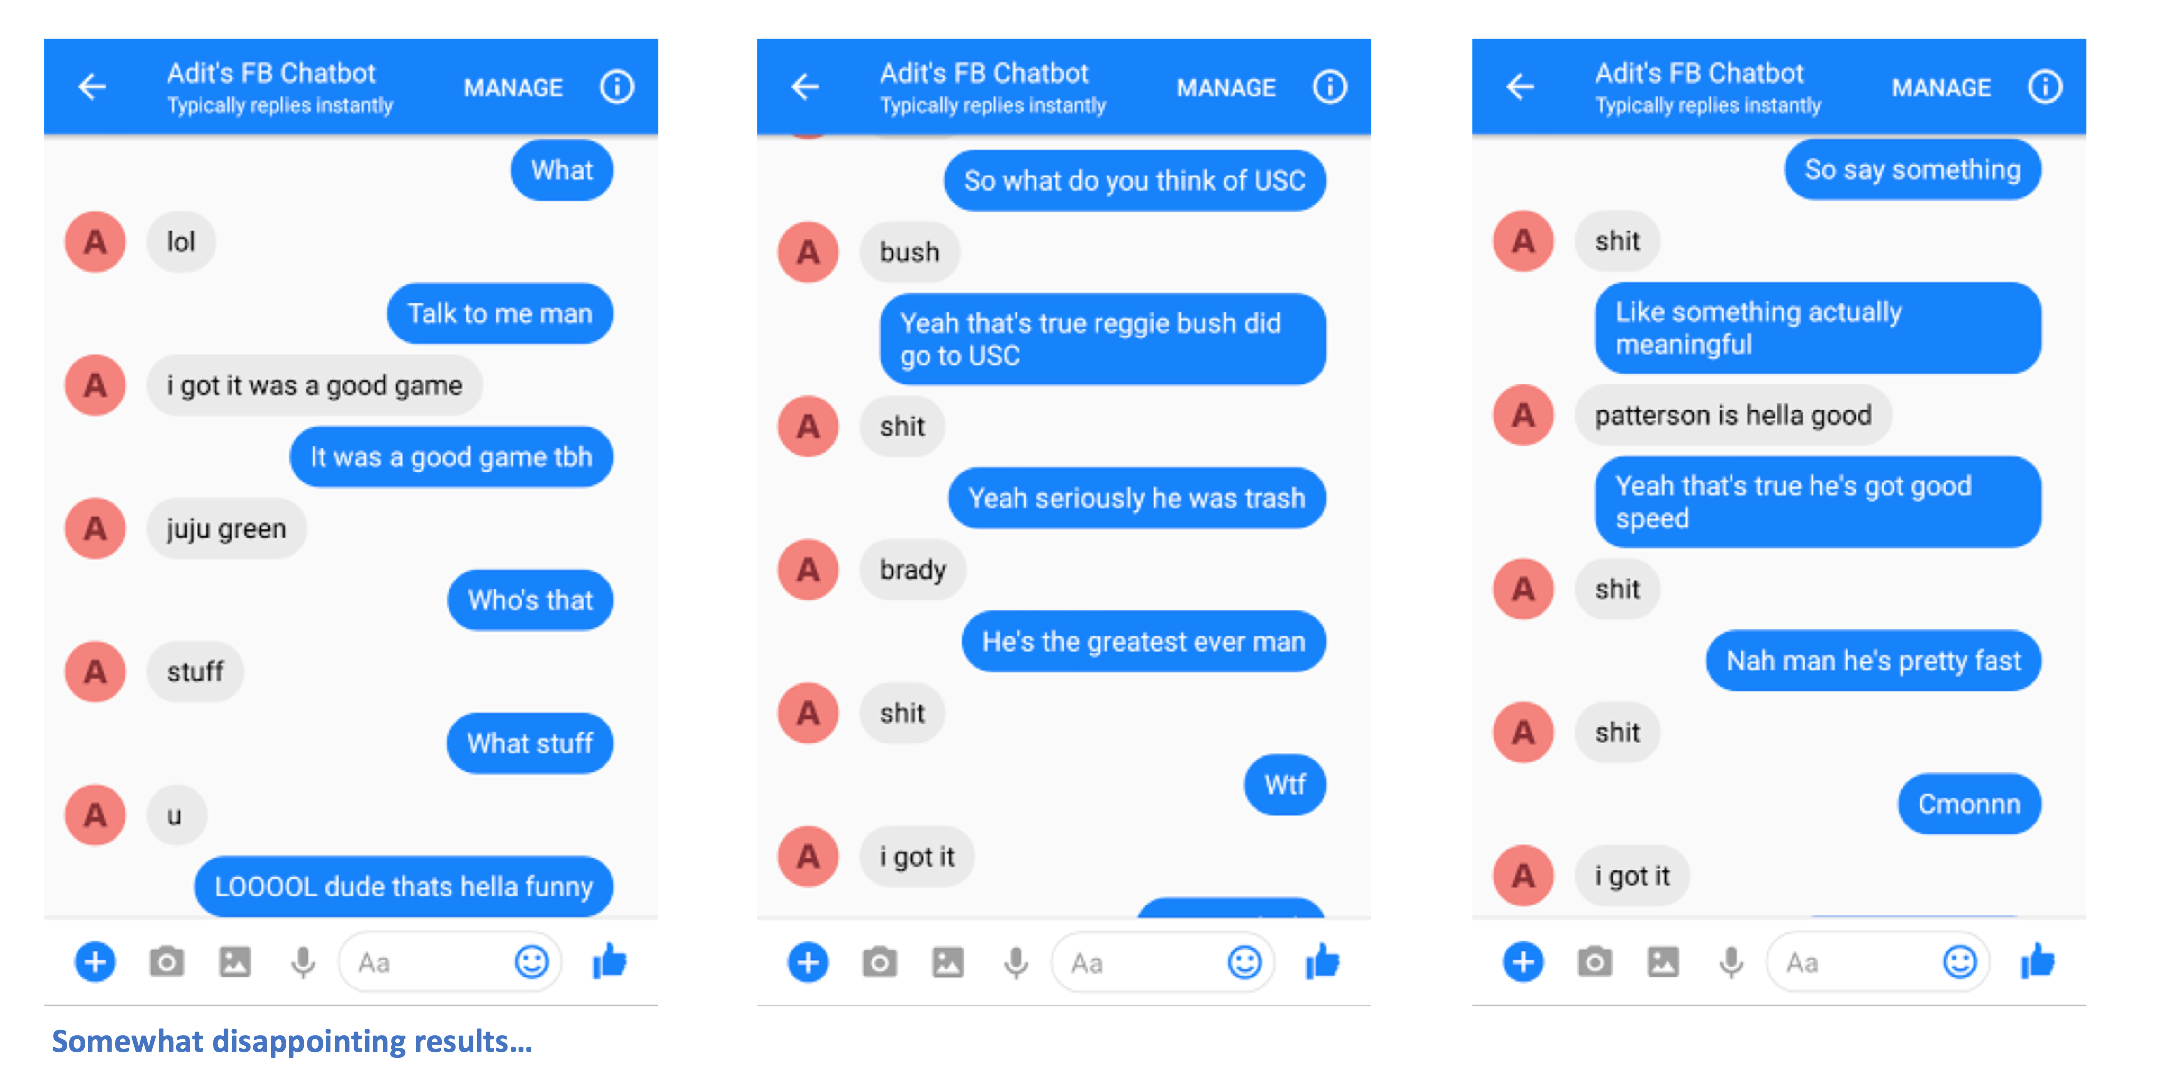
I thought the first one was especially funny because “juju green” actually seems to be a combination of Juju Smith-Schuster, a Steelers wide receiver, and Draymond Green who is a forward for the Golden State Warriors. Interesting combination.
Okay let's be real. The performance is not that great right now to say the least. Let's think about ways to improve it though!
Ways to Improve
As you can probably tell from interacting with the chatbot, there is definitely room for a lot of improvement. After a couple of messages, it quickly becomes clear that having a sustained conversation simply just isn’t possible. The chabtot iisn’t able to connect thoughts together, and some of the responses seem random and incoherent. Here are some ways that could improve our chatbot’s performance.
- Incorporate other datasets to help the network learn from a larger conversation corpus. This would remove a bit of the "individualness" of the chatbot since it's strictly trained on my own conversations right now. However, I believe it would help generate more realistic conversations.
- Handling scenarios where the encoder message has nothing to do with what the decoder message is. Example is when one conversation ends, and you start a new one the next day. The topic of conversation could be completely unrelated. This could affect the model's training.
- Using bidirectional LSTMs, attention mechanisms, and bucketing.
- Tuning hyperparameters such as number of LSTM units, number of LSTM layers, choice of optimizer, number of training iterations, etc.
Would be curious to hear other suggestions in the comments too!
How You Can Build Your Own
If you’ve been following along, you should have a general idea of what’s needed to create a chatbot that talks like you. Let’s go over the steps one final time. Detailed instructions are available in the GitHub repo README.
- Find all the online social media sites in which you’ve had a conversation with someone, and download a copy of your data.
- Extract all the (MESSAGE, RESPONSE) pairs with CreateDataset.py or your own script.
- (OPTIONAL) Generate word vectors for each of the words that show up in our conversations through Word2Vec.py.
- Create, train, and save the sequence to sequence model in Seq2Seq.py.
- Create the Facebook chatbot.
- Create a Flask server where you deploy the saved Seq2Seq model.
- Edit index.js file in your Express app so it can communicate with the Flask server.
Interesting Papers
- Sequence to Sequence Learning
- Seq2Seq with Attention
- Neural Conversational Model
- Generative Hierarchical Models
- Persona Based Model
- Deep RL for Dialogue Generation
- Attention with Intention
- Diversity Promoting Objective Functions
- Copying Mechanisms in Seq2Seq
Other Helpful Posts
- Great blog post on Seq2Seq
- Slides from a Tensorflow course at Stanford
- Tensorflow Seq2Seq documentation
- Helpful video tutorial on using Tensorflow’s Seq2Seq functions
Shout out to Amit Tallapragada, Arvind Sankar, and Neil Chen for helping me out with Flask and Javascript stuff.
Dueces.
Sources Tweet